> ## Documentation Index
> Fetch the complete documentation index at: https://developers.resistant.ai/llms.txt
> Use this file to discover all available pages before exploring further.
# SSO setup with MS Entra ID (SAML)
> Step-by-step guide for configuring SAML 2.0 Single Sign-On (SSO) with Microsoft Entra ID for the Resistant Documents Web UI.
This guide explains how to configure **SAML 2.0 Single Sign-On (SSO)** between **Microsoft Entra ID** and the **Resistant Documents Web UI**.
This SSO integration is designed for human interaction with the Internet hosted Web UI application. It is entirely separate from the platform's API access, which is reserved for automation tools and custom integrations.
***
## What you’ll set up
You will create a **non-gallery** Enterprise Application in Microsoft Entra ID (previously known as Azure Active Directory) and configure it for **SP-initiated** SAML SSO to the Resistant Documents Web UI.
At the end you will have:
* SAML SSO working end-to-end (login redirect → assertion → Web UI session)
* Required user claims mapped (`email`, `firstName`, `lastName`)
* Role mapping via `documents_roles` (strongly recommended)
***
## Prerequisites
Before you begin, ensure you have:
* An active Resistant AI subscription or tenant
* An active Microsoft Entra ID tenant
* An Entra administrator account that can create Enterprise Applications
This usually requires one of:
* Cloud Application Administrator
* Application Administrator
* Global Administrator
***
## Testing vs. production
Testing and production Web UI tenants are separate.
* You typically configure **two Enterprise Applications** in Entra: one for testing and one for production
* Users must be assigned separately for each environment
* Resistant AI will provide environment-specific **Entity ID** and **ACS (Reply URL)** values
***
## Step 1 — Request configuration values from Resistant AI
Ask Resistant AI to providethe SAML configuration values required for each environment. These typically include:
* **Identifier (Entity ID / Audience URI)**
* **Reply URL (ACS URL)**
* **Sign-on URL** (your Web UI entry URL)
* (Optional) SP metadata XML (recommended for import)
***
## Step 2 — Create a custom (non-gallery) Enterprise Application
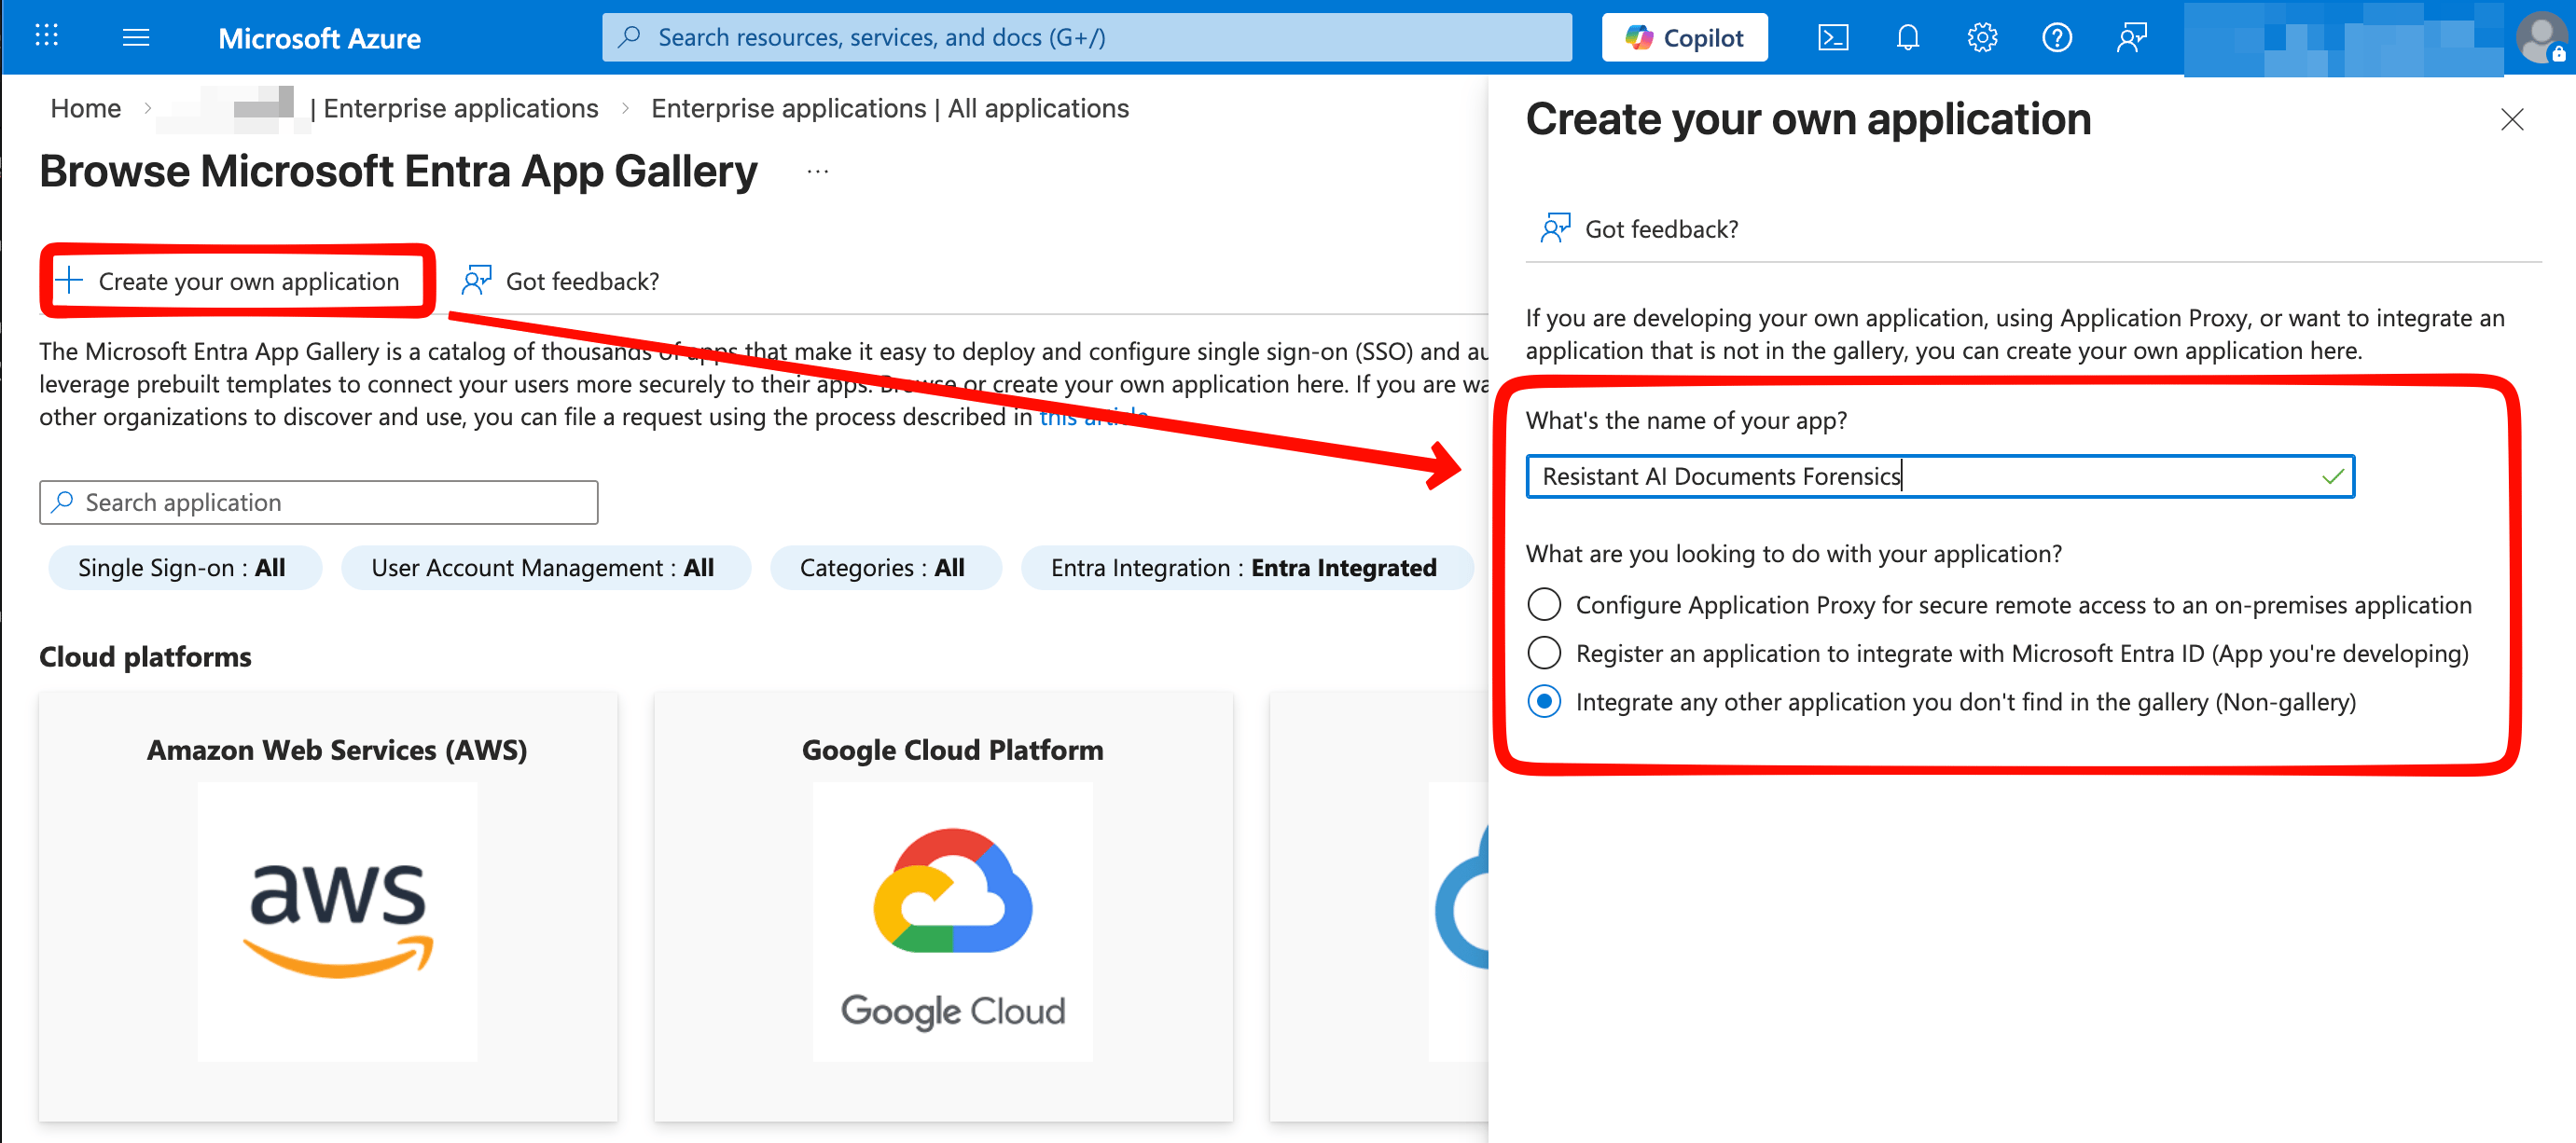
1. Sign in to the Azure portal and open **Microsoft Entra ID**.
2. Go to **Enterprise applications** → **New application**.
3. Select **Create your own application**.
4. Enter an application name (example: **Resistant AI Document Forensics**).
5. Select **Integrate any other application you don't find in the gallery (Non-gallery)**.
 ## Step 3 — Configure basic SAML settings
In the new enterprise application:
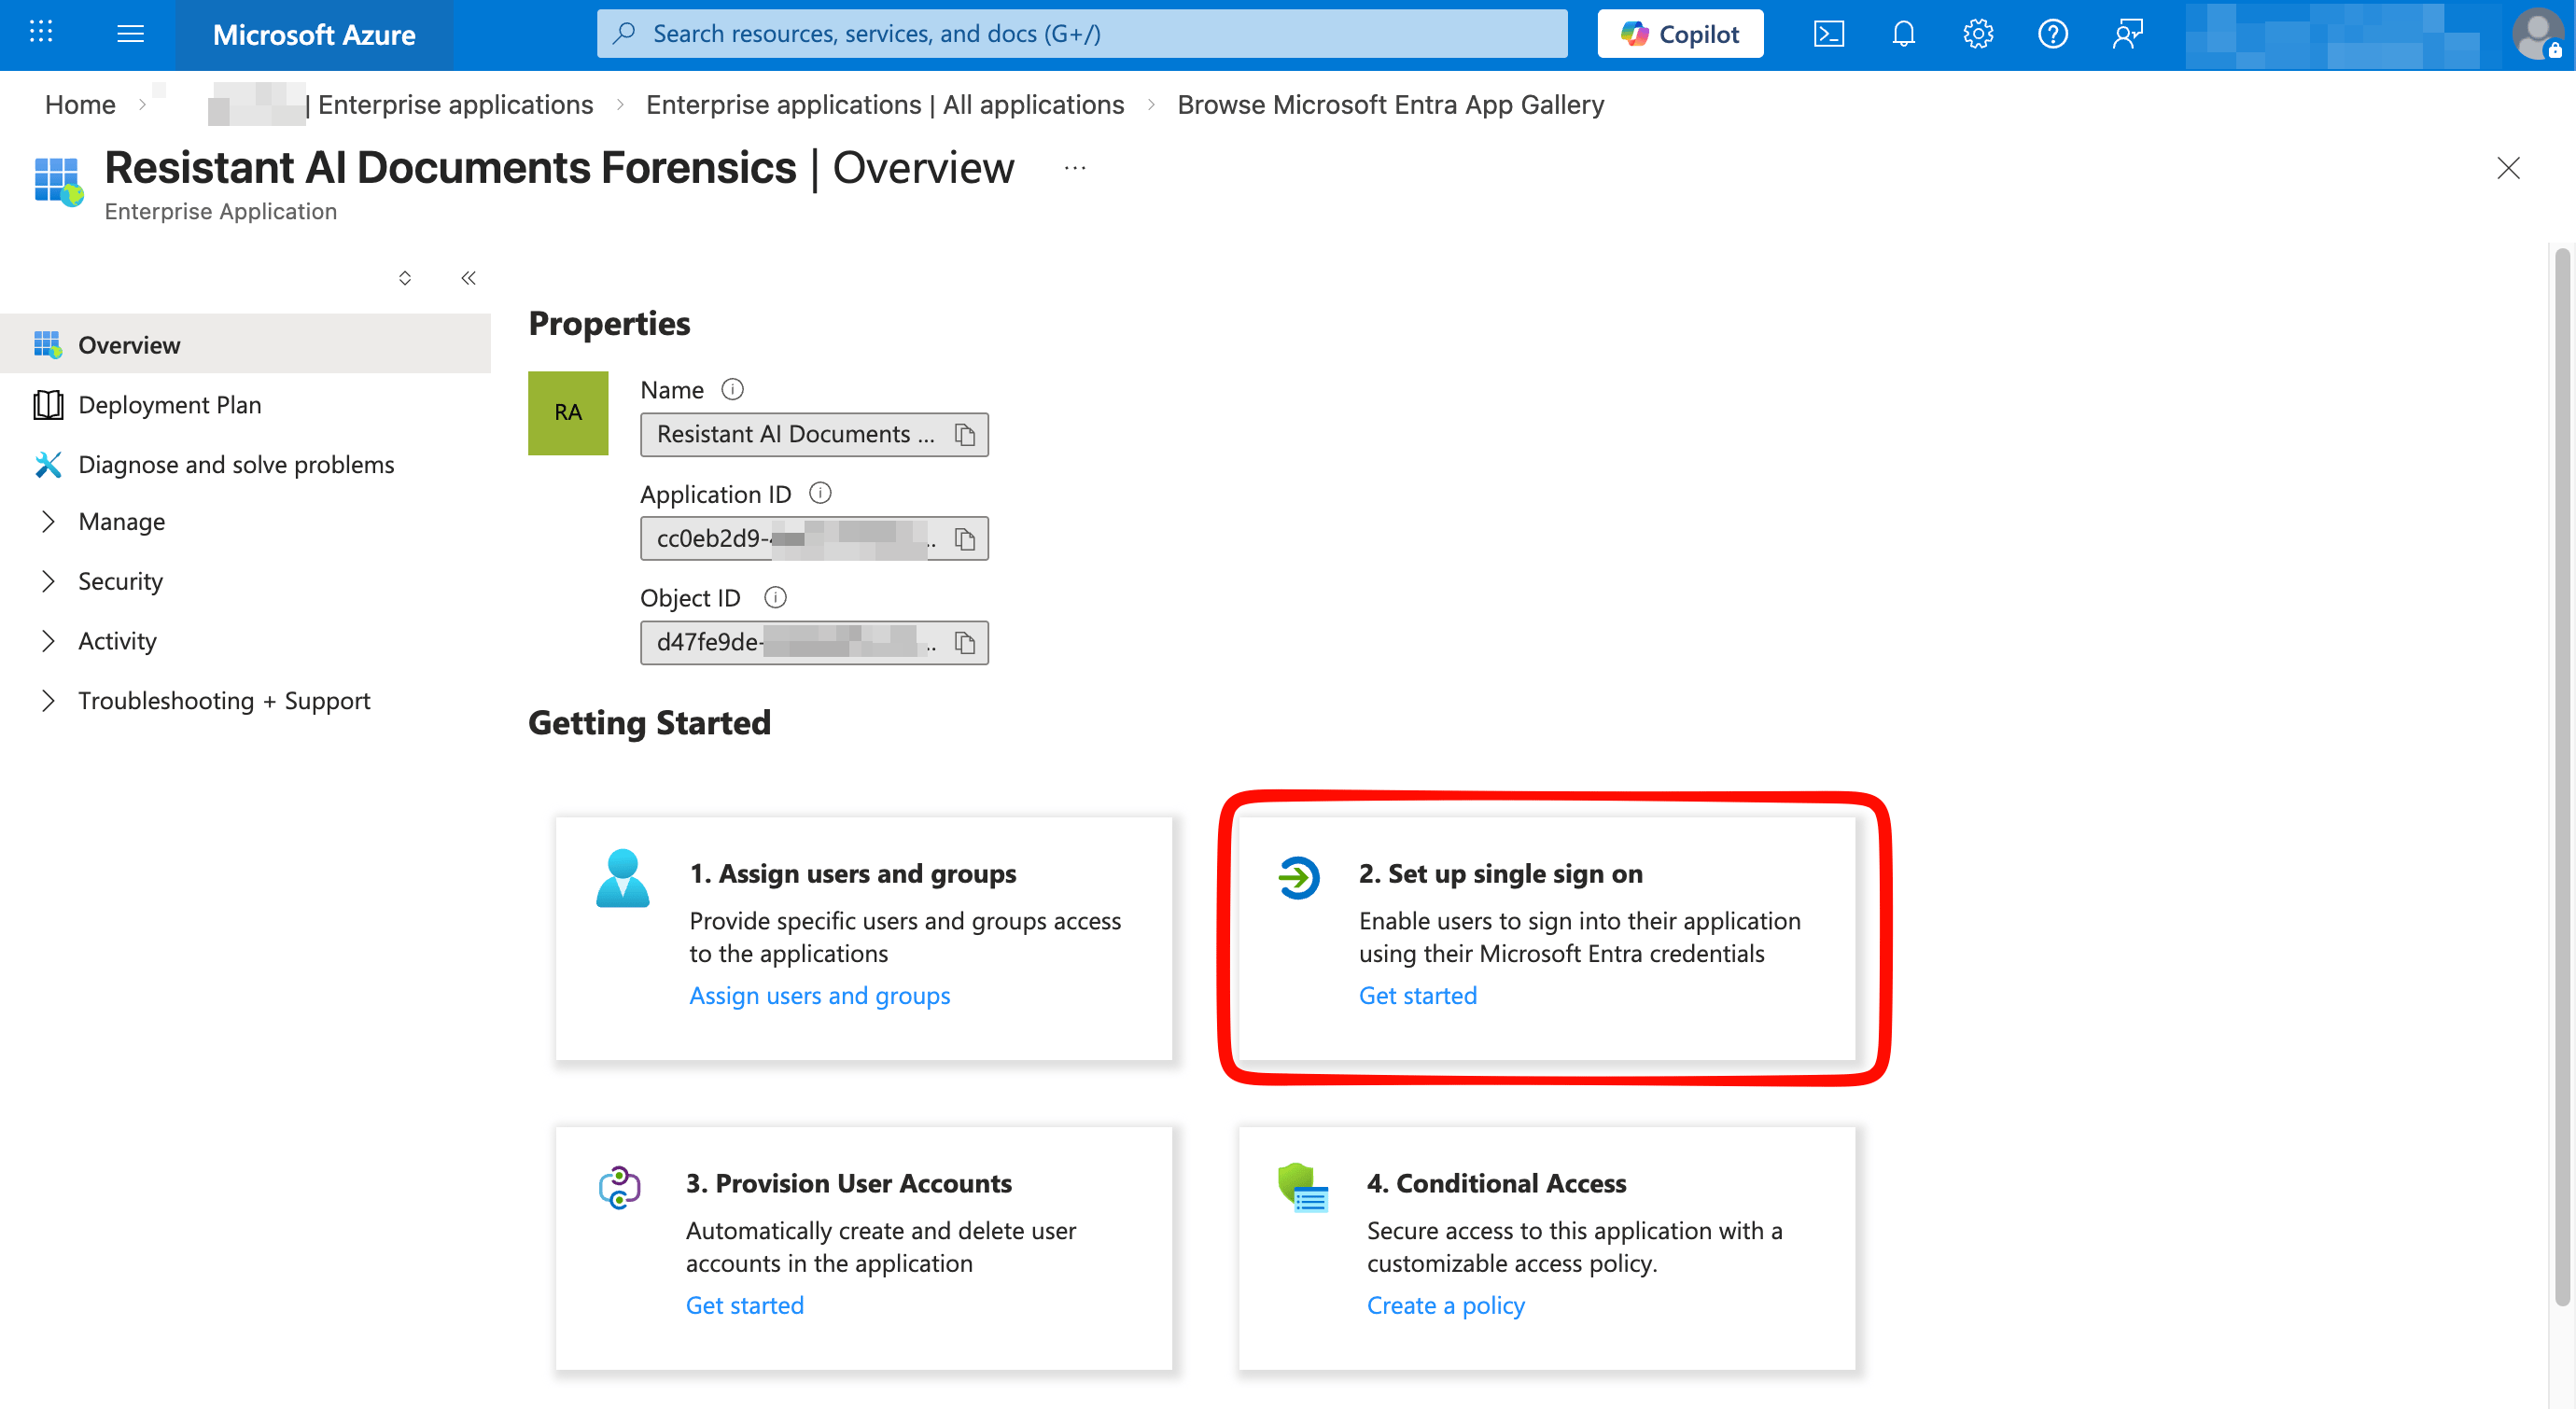
1. Open **Overview** and select **Set up single sign-on**, or go to **Manage** > **Single sign-on**.
## Step 3 — Configure basic SAML settings
In the new enterprise application:
1. Open **Overview** and select **Set up single sign-on**, or go to **Manage** > **Single sign-on**.
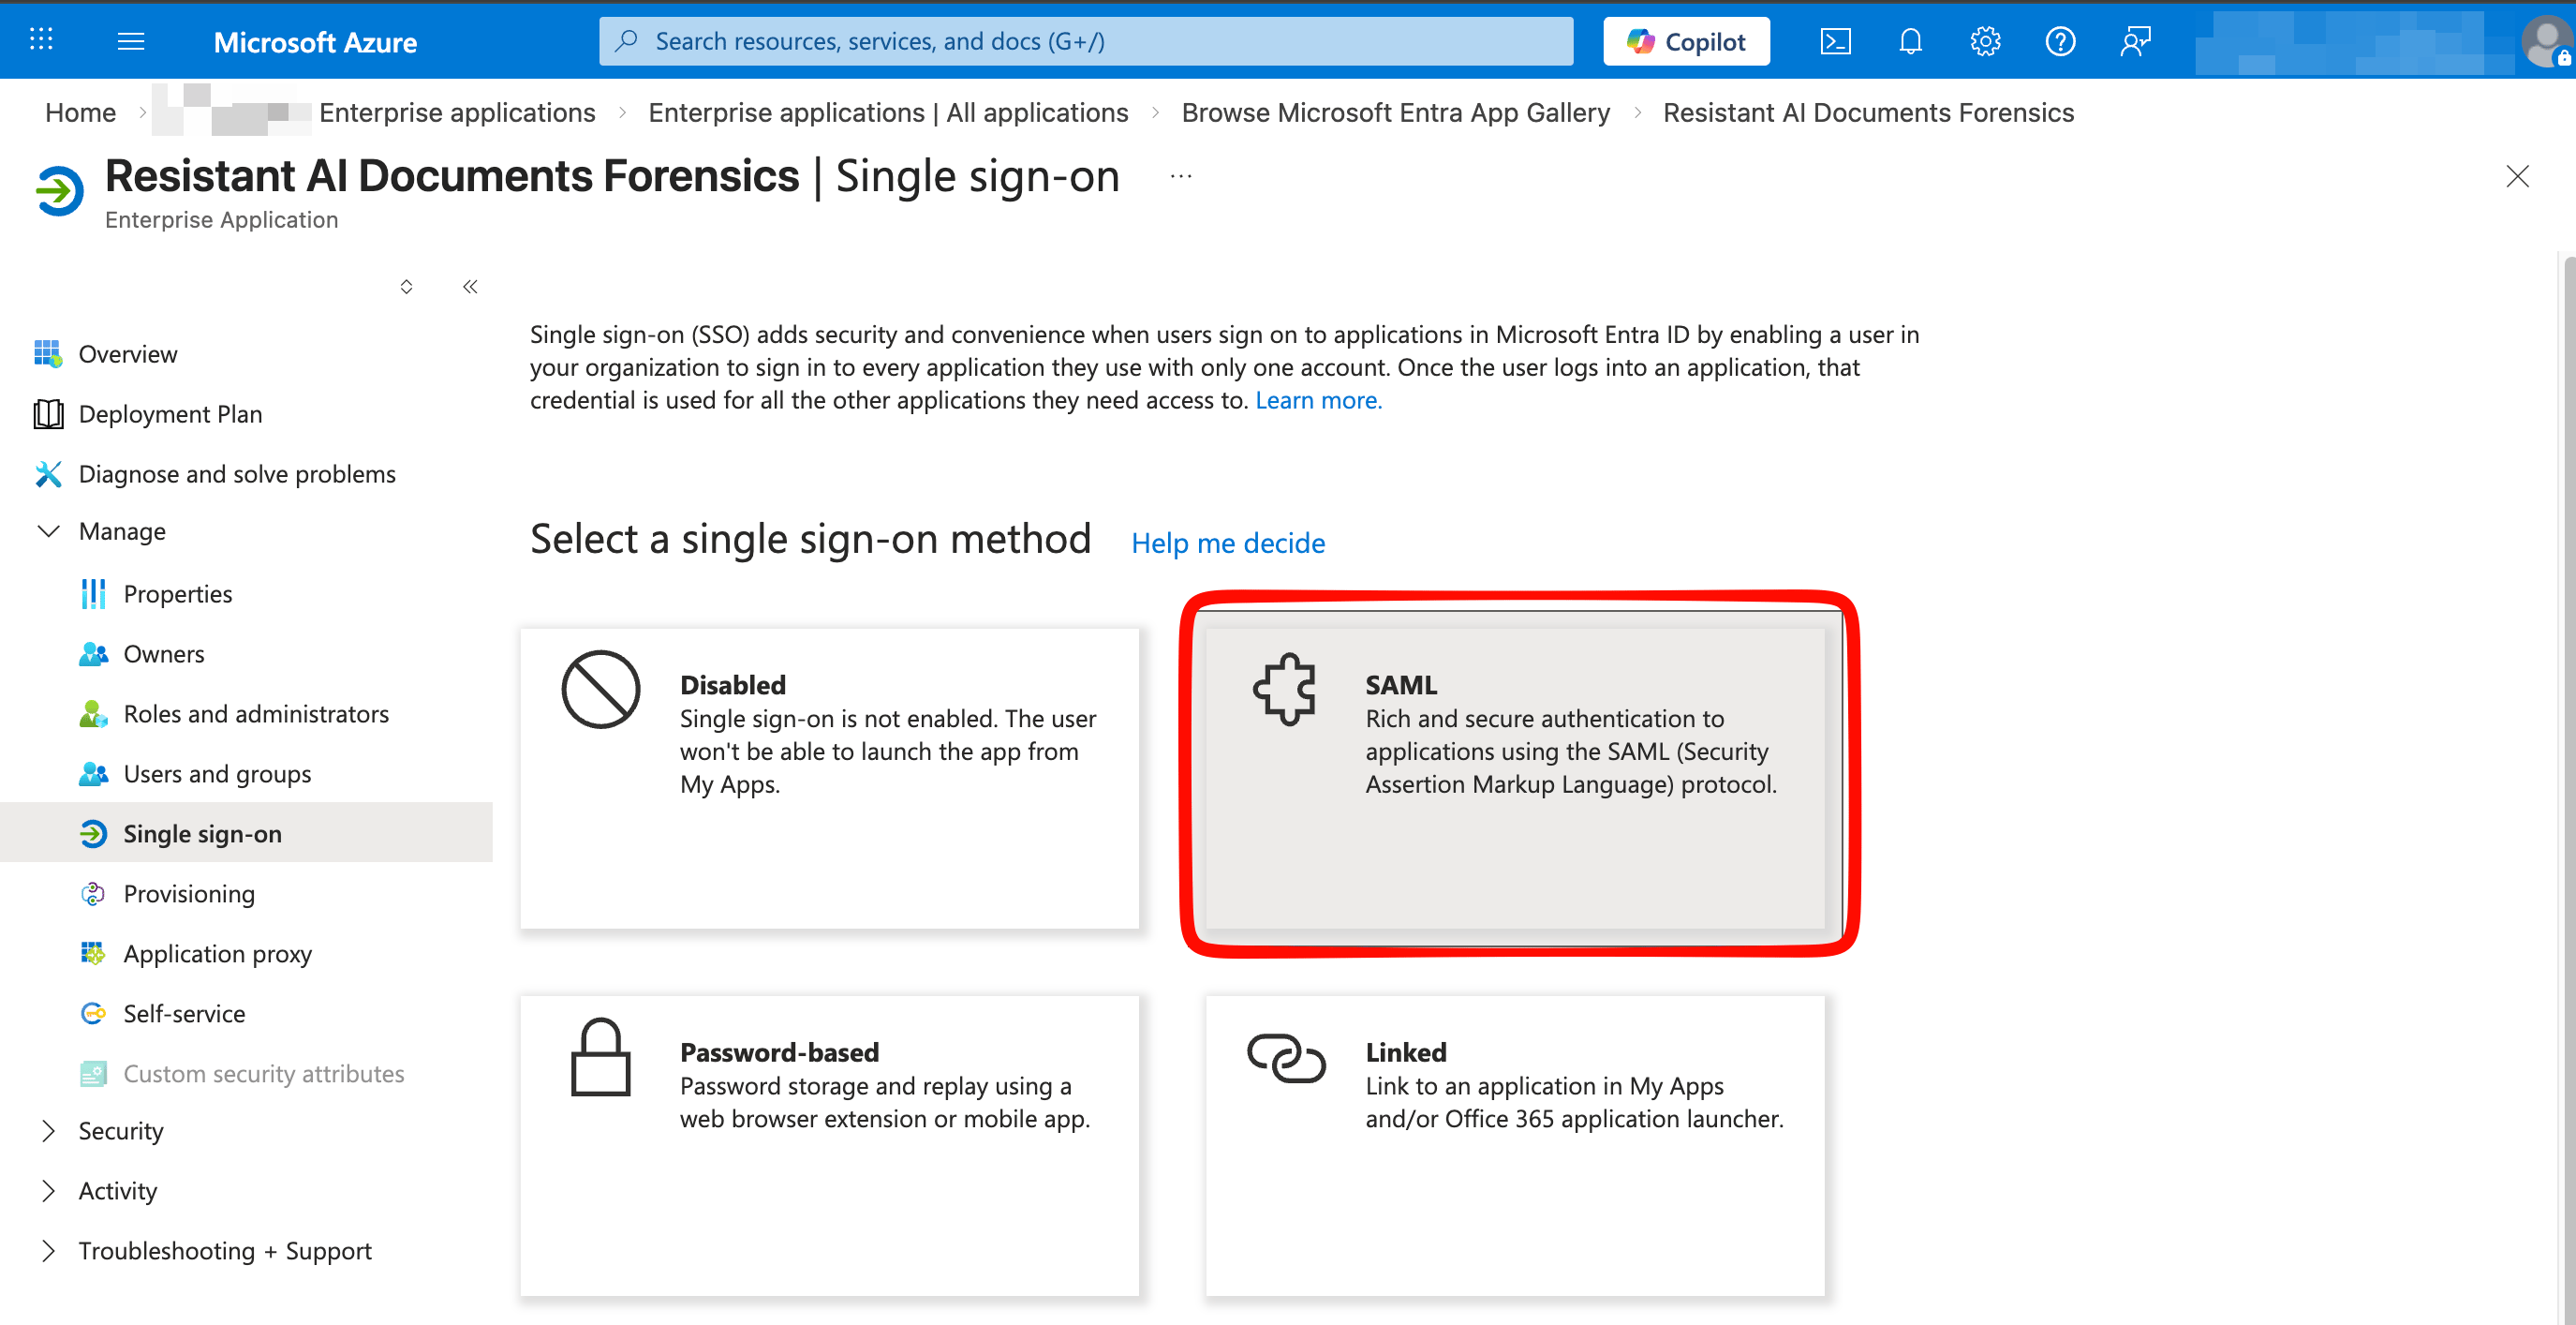
 2. Select **SAML** as the single sign-on method.
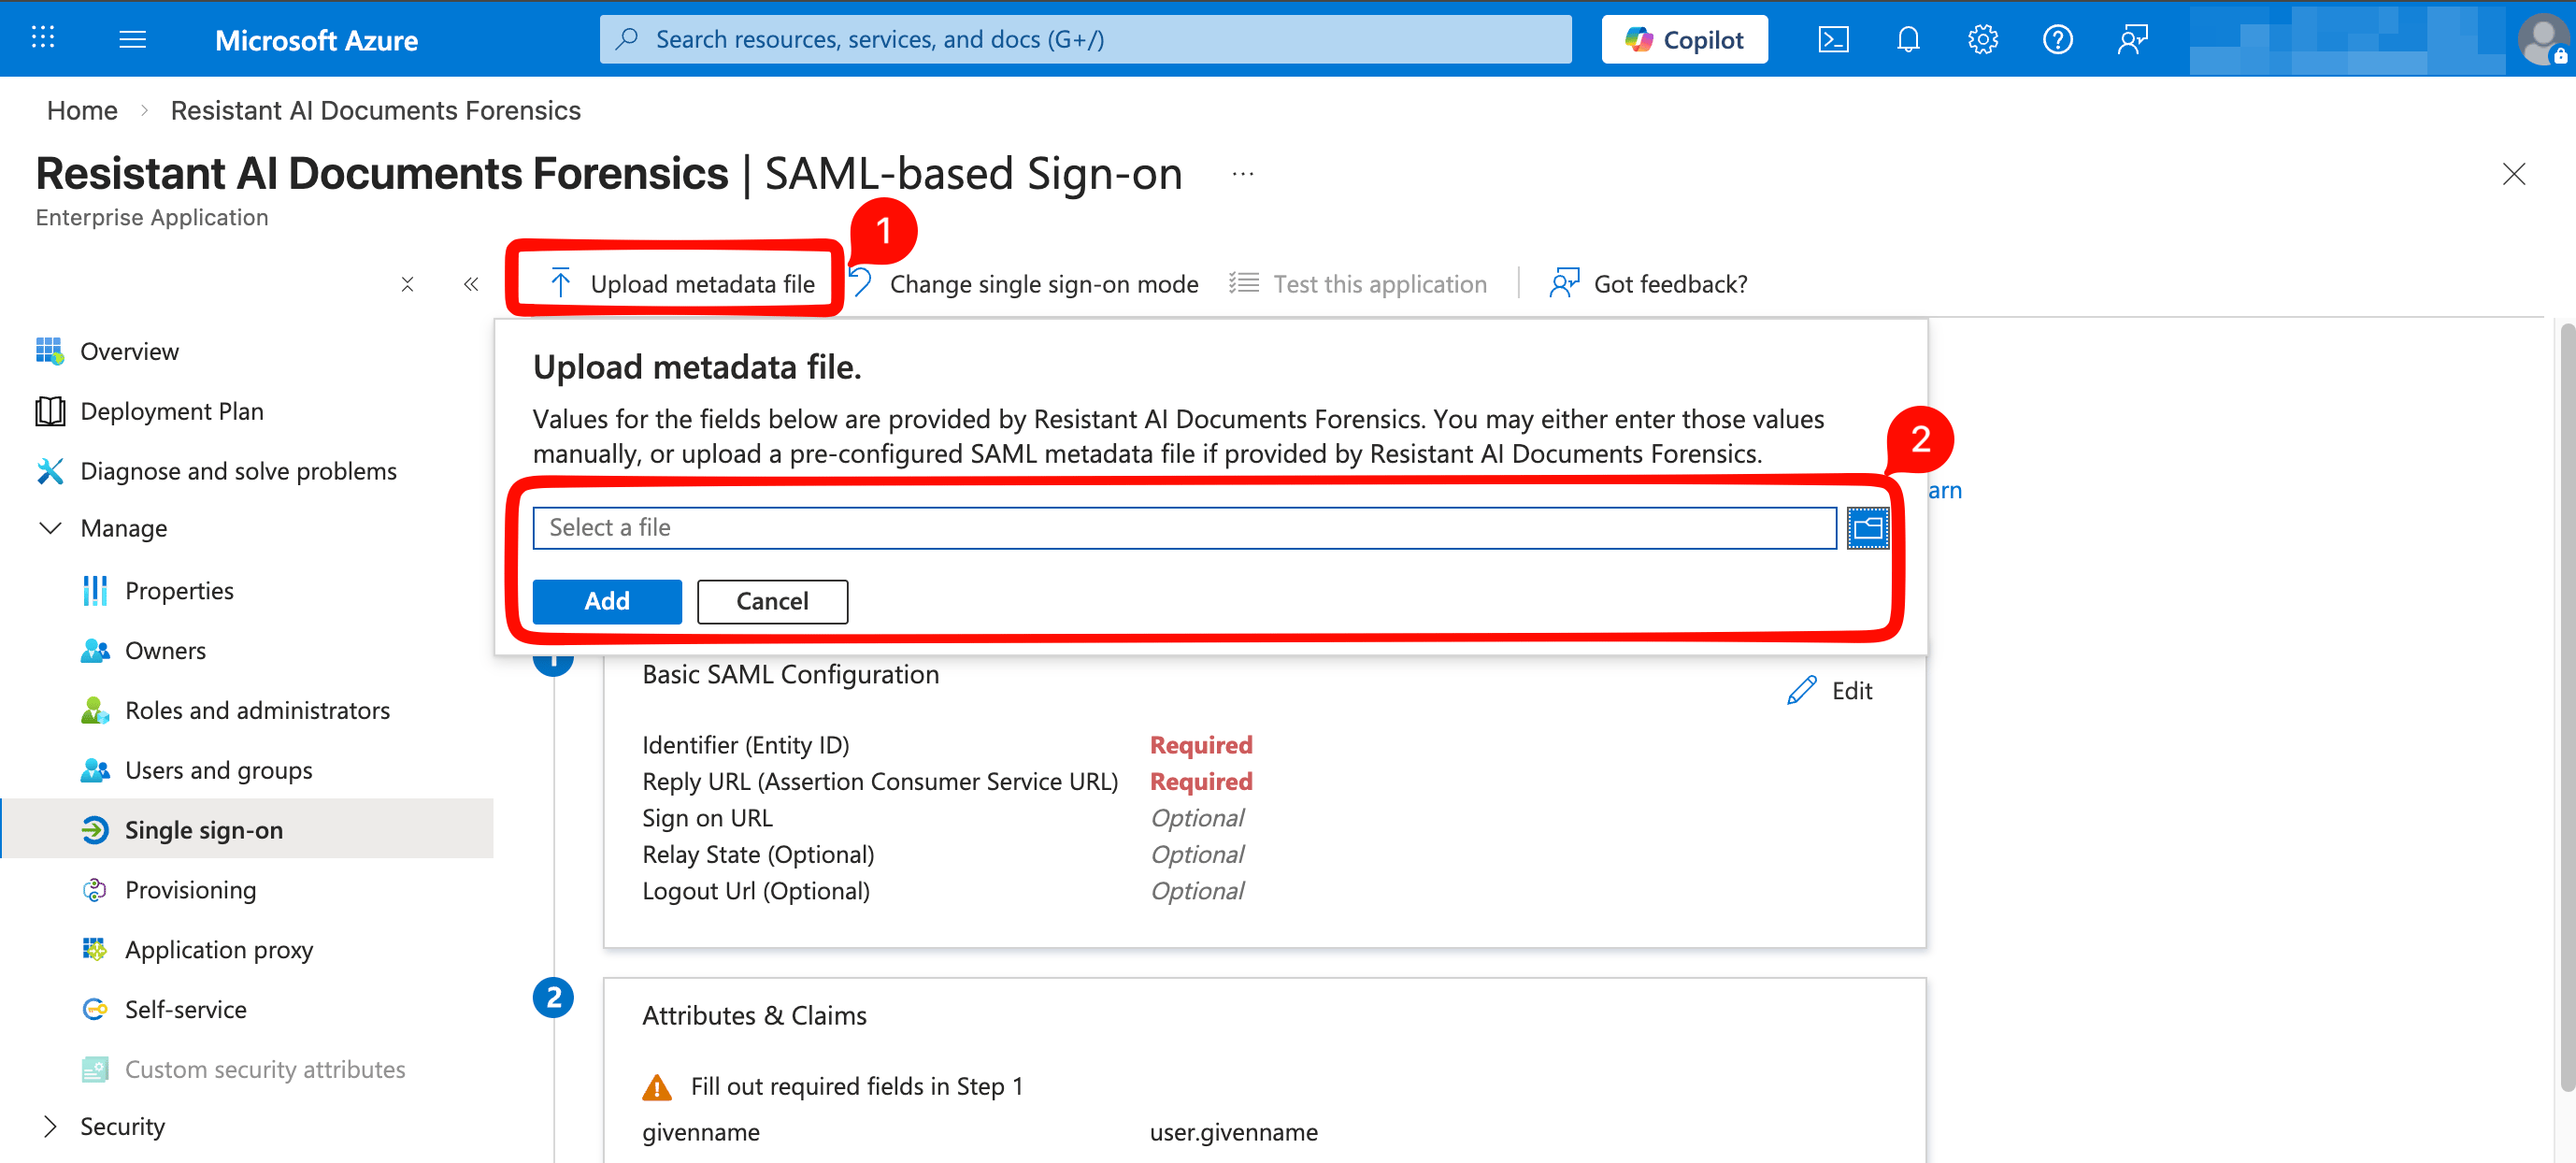
 3. Import the key SAML parameters from the metadata XML file provided by Resistant AI:
* Select **Upload metadata file**
* Choose the **Metadata XML file**
* Select **Add**
3. Import the key SAML parameters from the metadata XML file provided by Resistant AI:
* Select **Upload metadata file**
* Choose the **Metadata XML file**
* Select **Add**
 4. Review the prefilled values in **Basic SAML Configuration**:
* Confirm that **Identifier** and **Reply URL** match the values provided by Resistant AI
* Enter the **Sign-on URL** using your Resistant AI Document Forensics UI URL
* Select **Save**, then close the dialog
4. Review the prefilled values in **Basic SAML Configuration**:
* Confirm that **Identifier** and **Reply URL** match the values provided by Resistant AI
* Enter the **Sign-on URL** using your Resistant AI Document Forensics UI URL
* Select **Save**, then close the dialog
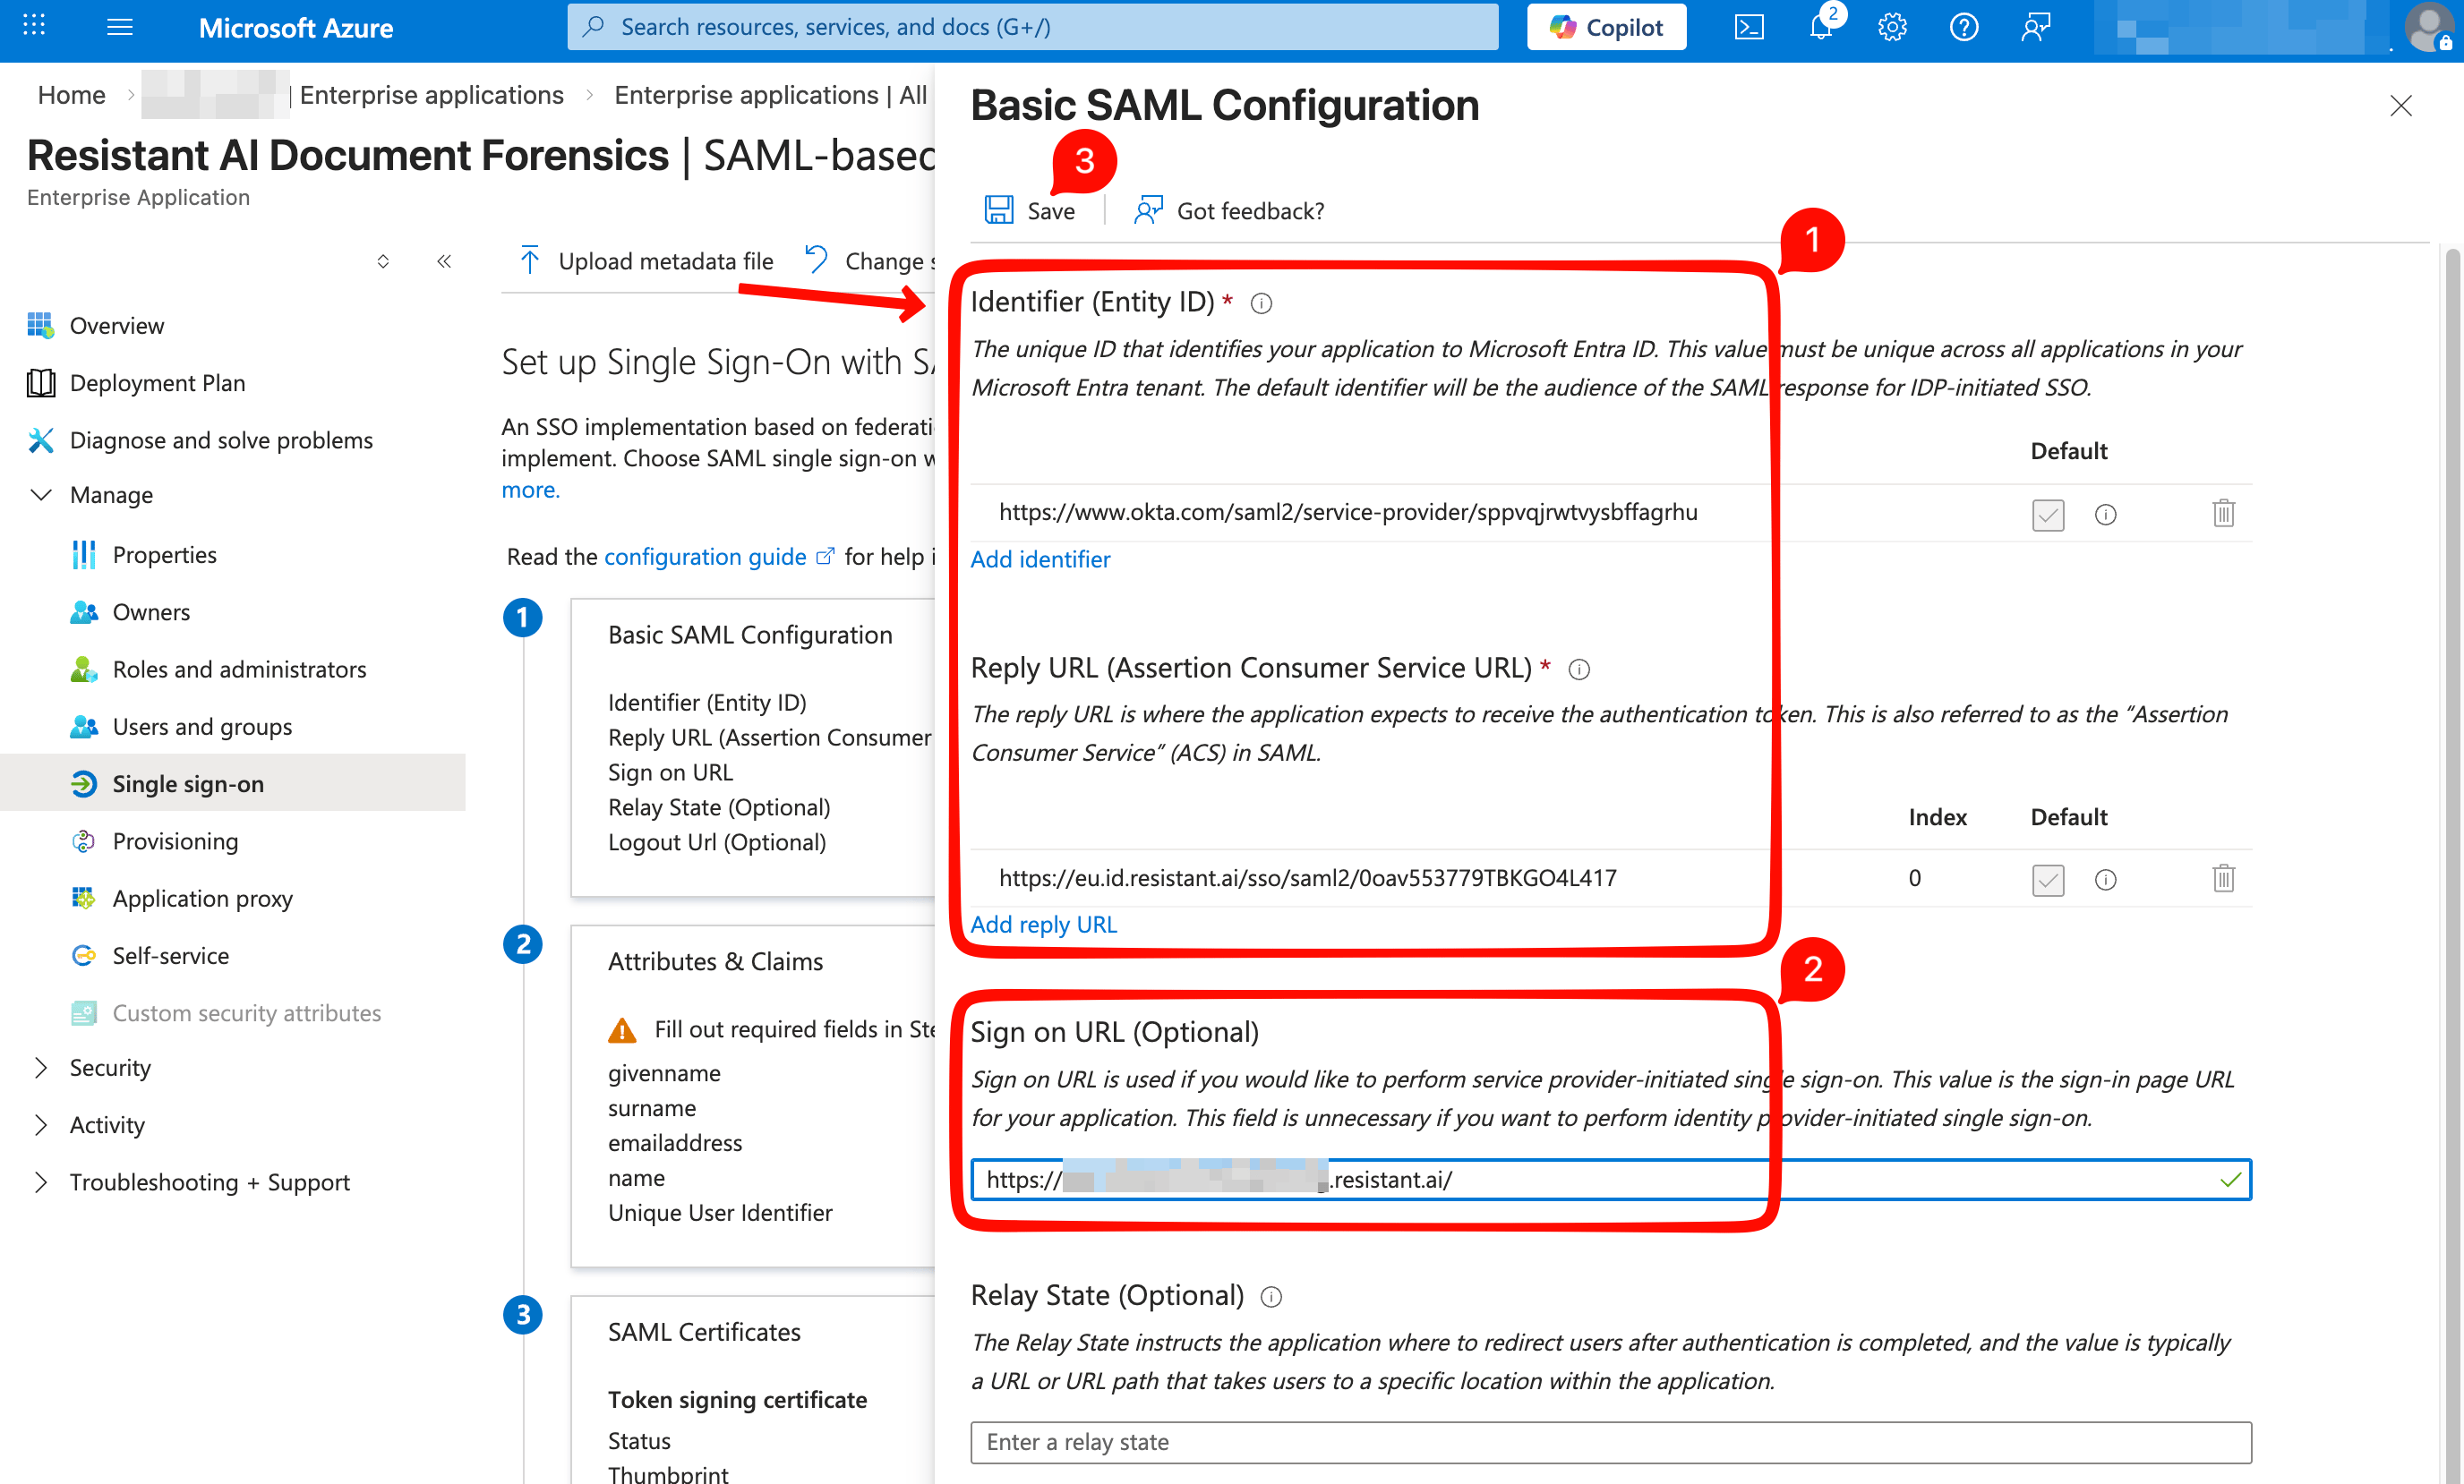 5. If Microsoft Entra ID offers to test the SSO integration at this stage, select **No, I'll test later**.
 ## Step 4 — Configure attributes and claims
Microsoft Entra ID must send the required user profile attributes with each successful SSO login.
| Required? | Claim name | Source attribute | Data type | Namespace | Name format |
| -------------------- | ---------------- | ---------------- | ---------------- | --------- | ----------------- |
| yes | email | user.mail | string | empty | Omitted (default) |
| yes | firstName | user.givenname | string | empty | Omitted (default) |
| yes | lastName | user.surname | string | empty | Omitted (default) |
| no (but recommended) | documents\_roles | varies | array of strings | empty | Omitted (default) |
1. In **Attributes & Claims**, update the default claims so they match the table above. For each required claim:
* Set **Name** to the claim name shown in the table, for example `email`
* Clear the **Namespace** field
* Set **Name format** to `Omitted (default)`
* Set **Source** to `Attribute`
* Select the correct **Source attribute**, for example `user.mail` After the changes, the **Additional claims** section should look similar to the example below:
## Step 4 — Configure attributes and claims
Microsoft Entra ID must send the required user profile attributes with each successful SSO login.
| Required? | Claim name | Source attribute | Data type | Namespace | Name format |
| -------------------- | ---------------- | ---------------- | ---------------- | --------- | ----------------- |
| yes | email | user.mail | string | empty | Omitted (default) |
| yes | firstName | user.givenname | string | empty | Omitted (default) |
| yes | lastName | user.surname | string | empty | Omitted (default) |
| no (but recommended) | documents\_roles | varies | array of strings | empty | Omitted (default) |
1. In **Attributes & Claims**, update the default claims so they match the table above. For each required claim:
* Set **Name** to the claim name shown in the table, for example `email`
* Clear the **Namespace** field
* Set **Name format** to `Omitted (default)`
* Set **Source** to `Attribute`
* Select the correct **Source attribute**, for example `user.mail` After the changes, the **Additional claims** section should look similar to the example below:
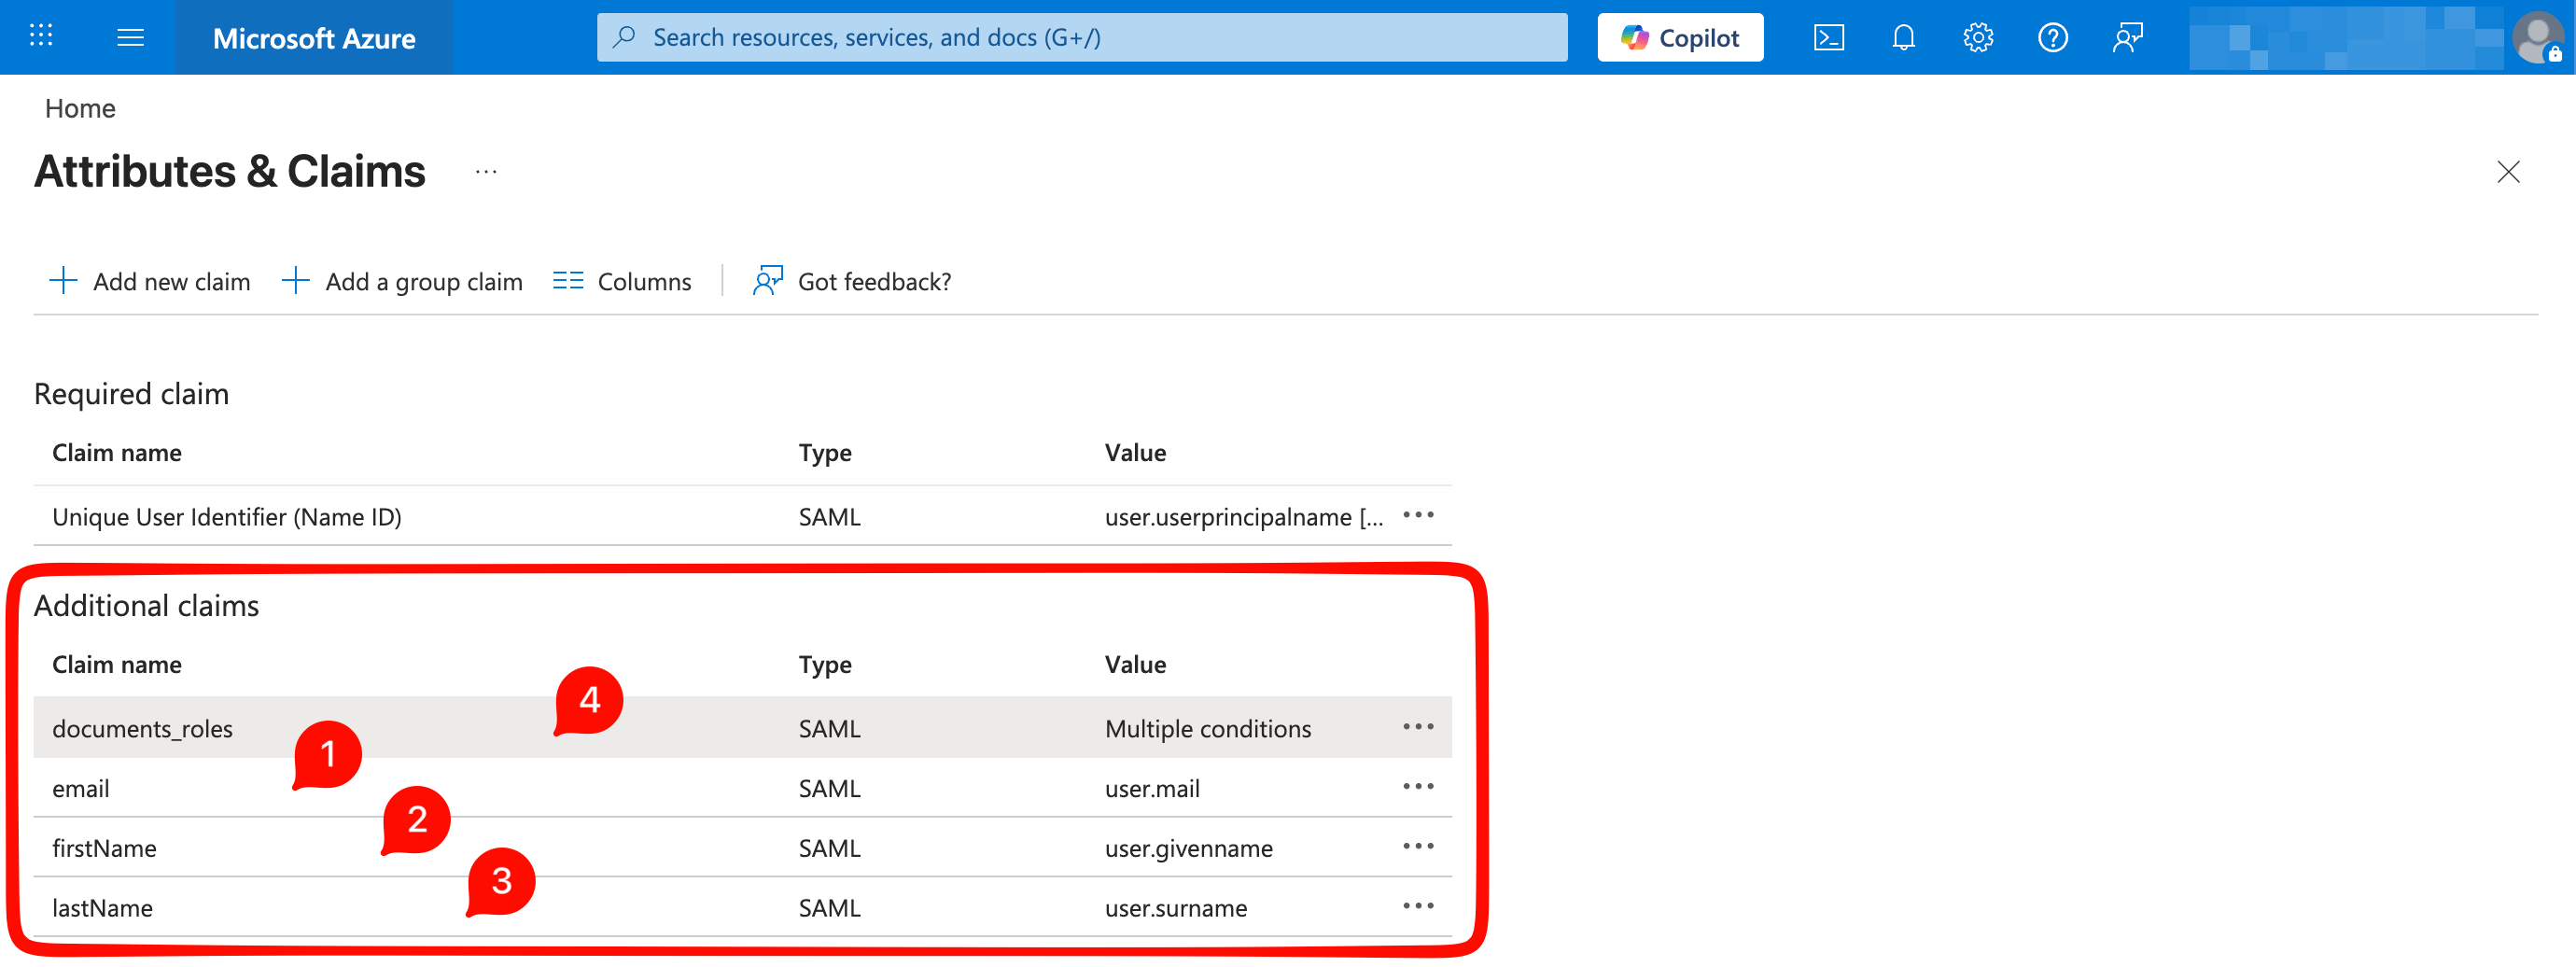 2. We strongly recommend adding the `documents_roles` claim to enforce role-based access control (RBAC) for the Resistant Documents Web UI. This lets you precisely control customer tenant access and Web UI application role assignments, whether configured statically or dynamically.
* Each value should combine:
* A tenant identifier, preferably the tenant ID provided by Resistant AI
* A separator, for example `_`
* A user role code. Supported role codes:
* `RW` = Read-Write
* `RO` = Read-Only
* `ADMIN`= Admin
* Example values:
* `"documents_roles": ["tenant1_RW"]`
* `"documents_roles": ["tenant1_RO", "tenant2_RW"]`
* `"documents_roles": ["29Z73Z5p2ECTsEdCzGA0AlpiaXQ_RW", "2w5buuFoVCn9dySYnsqedMkVI8N_RW", "29Z74Z5p2ADTsEdCyGA1AlpiaXQ_RW"]`
* With a Microsoft Entra ID P1 license or higher, you can use **App roles** to **dynamically assign user roles** in specific Web UI tenant instances. This lets you transform user security group memberships into a consolidated list of strings, passed as the value of the custom `documents_roles` claim:
2. We strongly recommend adding the `documents_roles` claim to enforce role-based access control (RBAC) for the Resistant Documents Web UI. This lets you precisely control customer tenant access and Web UI application role assignments, whether configured statically or dynamically.
* Each value should combine:
* A tenant identifier, preferably the tenant ID provided by Resistant AI
* A separator, for example `_`
* A user role code. Supported role codes:
* `RW` = Read-Write
* `RO` = Read-Only
* `ADMIN`= Admin
* Example values:
* `"documents_roles": ["tenant1_RW"]`
* `"documents_roles": ["tenant1_RO", "tenant2_RW"]`
* `"documents_roles": ["29Z73Z5p2ECTsEdCzGA0AlpiaXQ_RW", "2w5buuFoVCn9dySYnsqedMkVI8N_RW", "29Z74Z5p2ADTsEdCyGA1AlpiaXQ_RW"]`
* With a Microsoft Entra ID P1 license or higher, you can use **App roles** to **dynamically assign user roles** in specific Web UI tenant instances. This lets you transform user security group memberships into a consolidated list of strings, passed as the value of the custom `documents_roles` claim:
-
**In App Registration → App roles → Create app role for each alias, e.g.:**
* Display Name : `ResistantAI_Read-Only_Role`
* Value (emitted in claim) : `3BiP9sxUXfmhsuvKZtEPqD69e2F_RO`
* Allowed member types : `Users/Groups`
-
In Enterprise App → Users and groups → assign each security group to its matching app role:
* `Auditors` (security group) → App role: `ResistantAI_Read-Only_Role`
* `Fraud-Team` (security group) → App role: `ResistantAI_Read-Write_Role`
-
In Enterprise App → Single sign-on → Attributes & Claims → Add claim:
* Claim Name: `documents_roles`
* Type: `SAML`
* Value: `Multiple Conditional`
* User type: members
* Scoped Groups: Select your user group
* it can be a Dynamic Group that will join multiple users groups together
* Source: `Attribute`
* Value: `user.assignedroles`
3. After you complete this step, your Microsoft Entra ID configuration is ready. Resistant AI can complete the remaining configuration on the service provider side after receiving your identity provider metadata.
## Step 5 — Send Microsoft Entra ID metadata to Resistant AI
On the **SAML-based Sign-on** page, in the **SAML Certificates** section:
1. Download the **Federation Metadata XML** file.
2. Send the file to Resistant AI.
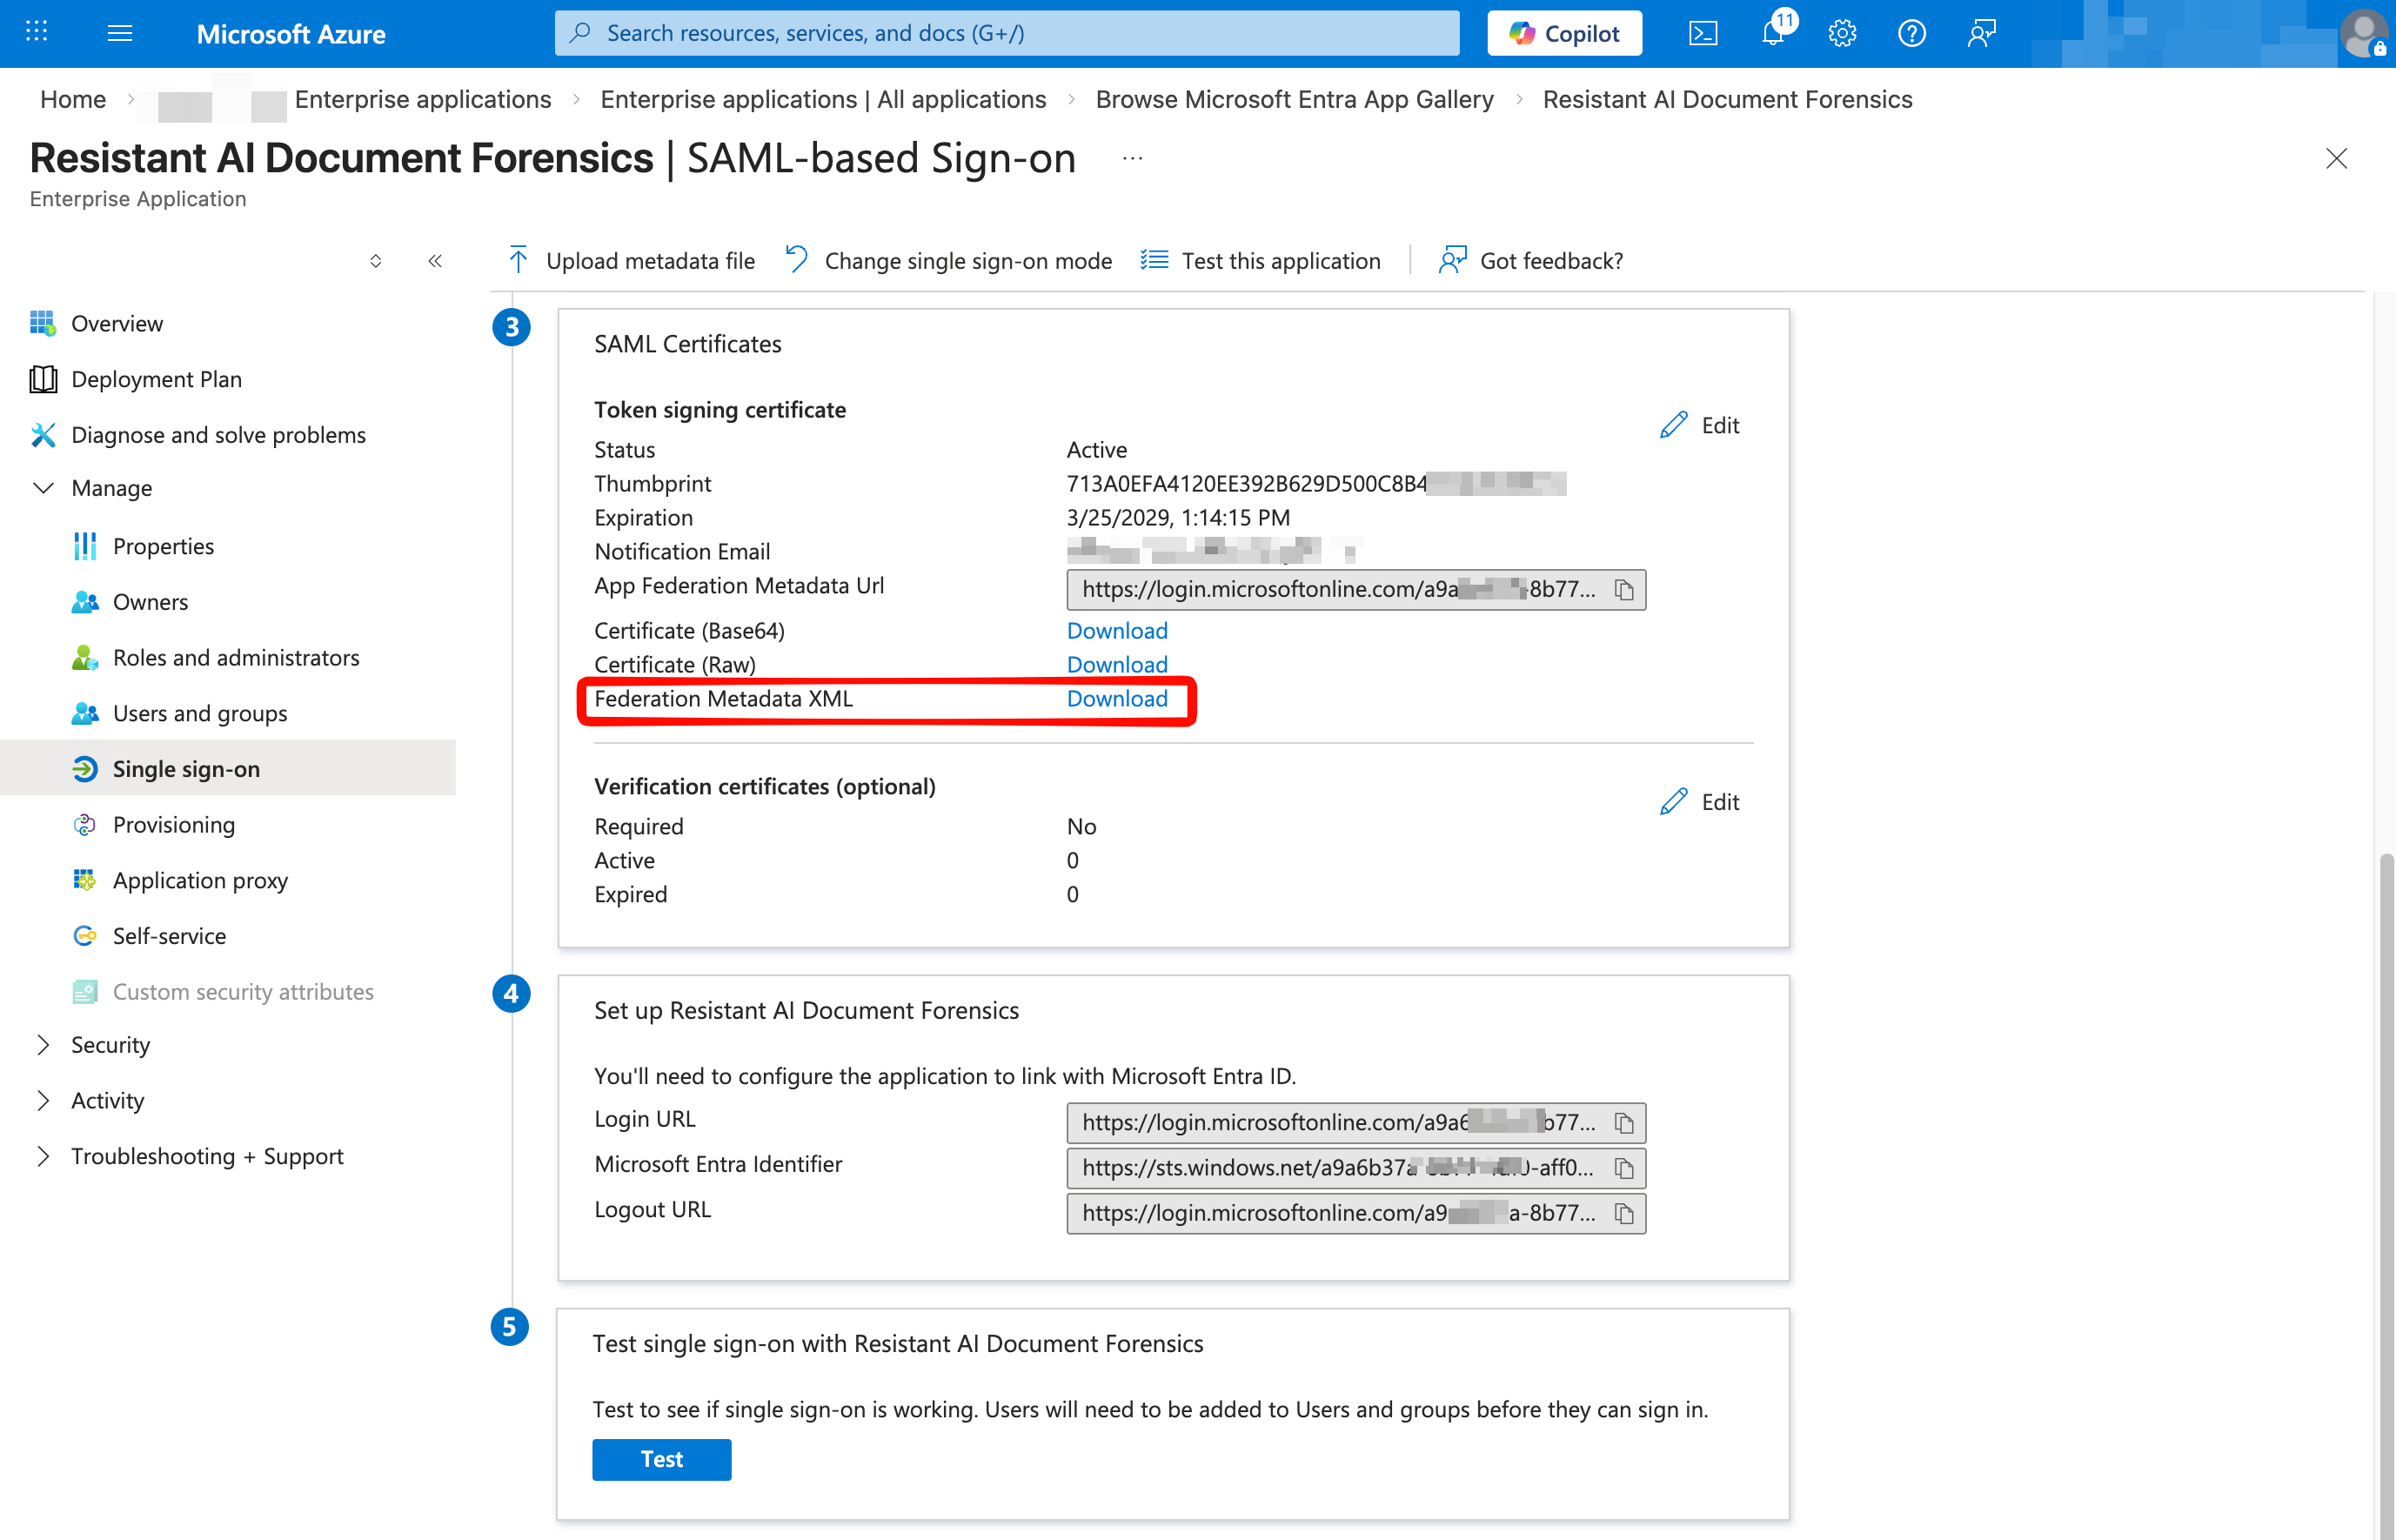 This file contains identity provider metadata, including identifiers and the public signing certificate. Handle it according to your organization's standard security practices.
## Step 6 — Wait for Resistant AI to complete the configuration
Resistant AI will finalize the Service Provider configuration and confirm when the integration is ready for testing.
## Step 7 — Test the SSO integration
Before testing:
* Assign a test user in Microsoft Entra ID to the new enterprise application.
* Make sure the test user can access the following URLs from a web browser:
* Your Microsoft Entra ID sign-in page, for example `https://login.microsoftonline.com/...`
* Your Resistant AI Document Forensics Web UI URL, for example `https://.documents.resistant.ai`
* Resistant AI Identity and Access Management (IAM) URL: `https://eu.id.resistant.ai`
Full Web UI functionality may also require access to additional backend endpoints. These can vary by customer deployment.
To test the SSO flow, use one of the following methods:
1. Ask the test user to open the Resistant AI Document Forensics UI URL in a browser and confirm that:
* The user is redirected to Microsoft Entra ID for authentication.
* After sign-in, the user is redirected back to the Resistant AI application successfully.
2. If the test user is also an administrator with access to this SSO configuration, use the built-in test function on the **SAML-based Sign-on** page.
This file contains identity provider metadata, including identifiers and the public signing certificate. Handle it according to your organization's standard security practices.
## Step 6 — Wait for Resistant AI to complete the configuration
Resistant AI will finalize the Service Provider configuration and confirm when the integration is ready for testing.
## Step 7 — Test the SSO integration
Before testing:
* Assign a test user in Microsoft Entra ID to the new enterprise application.
* Make sure the test user can access the following URLs from a web browser:
* Your Microsoft Entra ID sign-in page, for example `https://login.microsoftonline.com/...`
* Your Resistant AI Document Forensics Web UI URL, for example `https://.documents.resistant.ai`
* Resistant AI Identity and Access Management (IAM) URL: `https://eu.id.resistant.ai`
Full Web UI functionality may also require access to additional backend endpoints. These can vary by customer deployment.
To test the SSO flow, use one of the following methods:
1. Ask the test user to open the Resistant AI Document Forensics UI URL in a browser and confirm that:
* The user is redirected to Microsoft Entra ID for authentication.
* After sign-in, the user is redirected back to the Resistant AI application successfully.
2. If the test user is also an administrator with access to this SSO configuration, use the built-in test function on the **SAML-based Sign-on** page.
 SSO messages pass through the user’s browser. Browser developer tools and a SAML tracer are usually the fastest way to debug.
## Notes and tips
* **Email address changes**\
The email address received in the SAML claim is the primary user identifier. If it changes, the user may be treated as a new identity.
* **Maximum SSO session lifetime**\
12 hours
* **Idle SSO session timeout**\
2 hours
* **Supported SAML bindings**\
HTTP POST (preferred) and HTTP Redirect
* **SAML debugging tool**\
Use the **SAML-tracer** browser extension for [Chrome and other Chromium-based browsers](https://chromewebstore.google.com/detail/saml-tracer/mpdajninpobndbfcldcmbpnnbhibjmch) or [Firefox](https://addons.mozilla.org/en-US/firefox/addon/saml-tracer/)
* **Supported SSO flow**\
SP-initiated only. The SSO flow starts when the user opens the Resistant AI Web UI URL.
* **IdP-initiated sign-in**\
If the SSO flow is started directly from the identity provider without opening the Web UI URL, and no Sign-on URL is configured, the user may be redirected to the Resistant AI Okta dashboard instead of the Document Forensics application. This page is useful for checking account details and recent activity, but it is not the main application entry point. The page is available at [https://eu.id.resistant.ai/account-settings/home](https://eu.id.resistant.ai/account-settings/home).
If the Web UI does not load after login, confirm your corporate network allows users to access domains listed above in the chapter "Step 7 : Before testing".
***
## Next steps
* Generic SAML overview: [SSO setup (SAML 2.0)](./sso-saml)
* OIDC alternative: [SSO setup (OIDC)](./sso-oidc)
SSO messages pass through the user’s browser. Browser developer tools and a SAML tracer are usually the fastest way to debug.
## Notes and tips
* **Email address changes**\
The email address received in the SAML claim is the primary user identifier. If it changes, the user may be treated as a new identity.
* **Maximum SSO session lifetime**\
12 hours
* **Idle SSO session timeout**\
2 hours
* **Supported SAML bindings**\
HTTP POST (preferred) and HTTP Redirect
* **SAML debugging tool**\
Use the **SAML-tracer** browser extension for [Chrome and other Chromium-based browsers](https://chromewebstore.google.com/detail/saml-tracer/mpdajninpobndbfcldcmbpnnbhibjmch) or [Firefox](https://addons.mozilla.org/en-US/firefox/addon/saml-tracer/)
* **Supported SSO flow**\
SP-initiated only. The SSO flow starts when the user opens the Resistant AI Web UI URL.
* **IdP-initiated sign-in**\
If the SSO flow is started directly from the identity provider without opening the Web UI URL, and no Sign-on URL is configured, the user may be redirected to the Resistant AI Okta dashboard instead of the Document Forensics application. This page is useful for checking account details and recent activity, but it is not the main application entry point. The page is available at [https://eu.id.resistant.ai/account-settings/home](https://eu.id.resistant.ai/account-settings/home).
If the Web UI does not load after login, confirm your corporate network allows users to access domains listed above in the chapter "Step 7 : Before testing".
***
## Next steps
* Generic SAML overview: [SSO setup (SAML 2.0)](./sso-saml)
* OIDC alternative: [SSO setup (OIDC)](./sso-oidc)